


Price: $8.99 - $6.50
(as of Apr 07, 2025 00:59:32 UTC - apply to the purchase of this product.">Details)
The Best Way to Apply Press-On Nails: A Complete Guide
Introduction
Are you tired of spending hours at the salon just to get your nails done? Press-on nails might just be the solution you’ve been looking for! In this guide, we’ll explore the best way to apply press-on nails, ensuring you achieve a salon-quality look from the comfort of your home. With the rise in popularity of press-on nails, many people are searching for effective methods to apply them correctly. We’ll cover everything from preparation to aftercare, providing you with practical tips and tricks along the way.
Whether you’re a beginner or someone who has tried press-on nails before, this comprehensive guide will help you master the art of applying press-on nails like a pro. Let’s dive in!
Understanding Press-On Nails
What Are Press-On Nails?
Press-on nails are pre-designed, artificial nail extensions that can be easily applied at home. They come in various styles, colors, and lengths, making them a versatile choice for anyone looking to enhance their nail game. Unlike traditional acrylic or gel nails, press-on nails do not require lengthy application processes or harsh chemicals, making them a popular choice for those who want beautiful nails quickly and affordably.
Why Choose Press-On Nails?
Many people prefer press-on nails for several reasons. First, they are cost-effective compared to salon treatments. Second, they allow for creativity and customization without the commitment of permanent nail enhancements. Third, they are easy to apply and remove, making them perfect for special occasions or temporary styles. If you’re looking for a quick beauty fix, press-on nails are definitely worth considering!
Preparing for Application
Nail Preparation Steps
Before applying press-on nails, it’s crucial to prepare your natural nails properly. Here’s how to do it:
-
Clean Your Nails: Start by washing your hands with soap and water. This removes any dirt and oil that could prevent the adhesive from working effectively.
-
Shape and Buff: Use a nail file to shape your nails to your desired length. Buff the surface of your nails lightly to create a smooth base for the press-ons.
-
Push Back Cuticles: Gently push back your cuticles using a cuticle pusher. This step helps the press-on nails adhere better.
- Dehydrate Your Nails: Use a nail dehydrator or rubbing alcohol to remove any remaining oils. This step is essential for ensuring a strong bond between your natural nails and the press-ons.
Choosing the Right Size
Selecting the correct size for your press-on nails is crucial for a seamless look. Most press-on nail sets come with multiple sizes. To find your perfect match:
-
Measure Your Nails: Use a measuring tape or a ruler to measure the width of your natural nails at the base.
-
Try Them On: Before applying, place each press-on nail on your natural nail to see which fits best.
- Adjust If Necessary: If a press-on nail is too wide, you can file it down for a better fit.
Applying Press-On Nails
Step-by-Step Application Guide
Now that your nails are prepped and you’ve chosen the right sizes, it’s time to apply your press-on nails. Here’s a simple step-by-step guide:
-
Choose Your Adhesive: You can use either nail glue or adhesive tabs. Nail glue provides a stronger hold, while adhesive tabs are easier to remove.
-
Apply Adhesive: If you’re using nail glue, apply a small amount to the back of the press-on nail and your natural nail. If using adhesive tabs, place them on your natural nail.
-
Press and Hold: Align the press-on nail with your natural nail and press down firmly for about 10-15 seconds. This ensures a secure bond.
-
Repeat for All Nails: Continue the process for all your nails, ensuring each one is properly secured.
- Final Touches: Once all nails are in place, you can file the edges if needed and apply a top coat for added shine and durability.
Tips for a Flawless Finish
- Avoid Water: After applying press-on nails, try to avoid water for at least an hour. This helps the adhesive set properly.
- Be Gentle: Treat your nails gently for the first few hours after application. Avoid heavy lifting or rough activities that could loosen the nails.
Aftercare Tips
Maintaining Your Press-On Nails
Taking care of your press-on nails is essential for longevity. Here are some simple aftercare tips:
-
Limit Exposure to Water: Prolonged exposure to water can weaken the adhesive. Use gloves when washing dishes or cleaning.
-
Avoid Harsh Chemicals: Stay away from strong cleaning products or nail polish removers that could damage the nails.
- Moisturize Regularly: Keep your hands and cuticles moisturized to prevent dryness and cracking.
How to Remove Press-On Nails Safely
When it’s time to remove your press-on nails, it’s important to do so safely to avoid damaging your natural nails. Here’s how:
-
Soak in Warm Water: Fill a bowl with warm, soapy water and soak your fingers for about 10-15 minutes. This helps loosen the adhesive.
-
Gently Pry Off: Use a wooden stick or a cuticle pusher to gently lift the press-on nails from the sides. Avoid pulling them off forcefully.
-
Remove Residue: If there’s any adhesive residue left on your nails, use rubbing alcohol or nail polish remover to clean it off.
- Nail Care Post-Removal: After removing the nails, give your natural nails some TLC. Moisturize and consider applying a nail strengthener to help them recover.
Conclusion
In conclusion, applying press-on nails can be a fun and rewarding experience, especially when you follow the right steps. From preparation to application and aftercare, each phase is crucial for achieving a beautiful look that lasts. Remember, the best way to apply press-on nails is to ensure your natural nails are clean, well-shaped, and properly prepped.
With the tips and techniques shared in this guide, you’ll be well on your way to mastering press-on nails. Say goodbye to long salon visits and hello to beautiful, hassle-free nails! Enjoy your new press-on nails, and don’t forget to show them off!
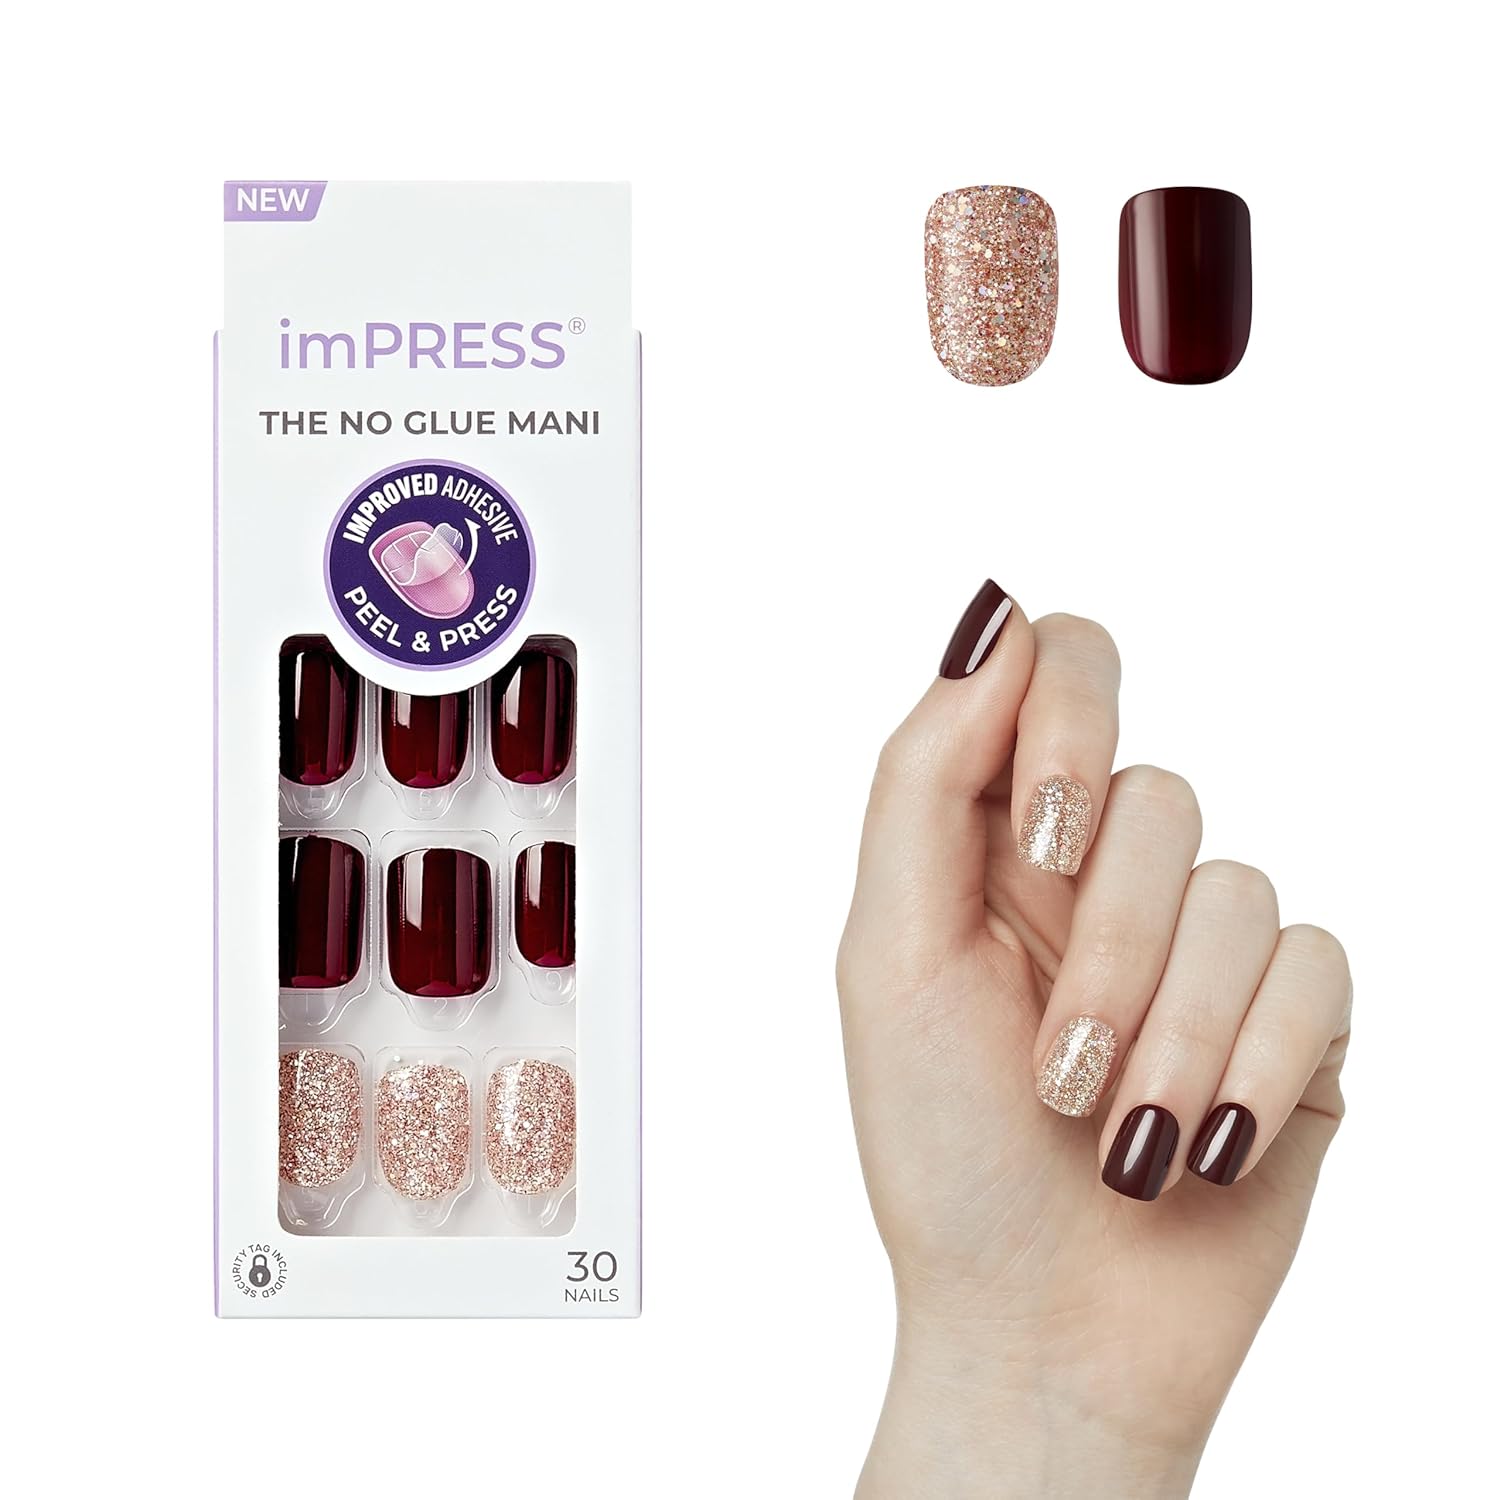
Press On & Go: The new generation manicure is here! Now with PureFit Technology, imPRESS is slimmer and super comfortable, resulting in the most natural looking fit. Get a salon quality mani in minutes; 30 Nails, Prep Pad, Mini File, and Cuticle Stick
DIY Nails That Wow: KISS imPRESS is always on trend, bringing you irresistible colors and finishes with glitter, 3D crystals, and more; Get in on the hottest colors, shapes, lengths, finishes, and custom art motifs; You can press-on at home in minutes
Long Lasting, Easy Application: Featuring Super Hold adhesive for durable wear, these chip-proof, smudge-proof, waterproof nails require no glue, no dry time; They're safe on natural nails and removal is hassle free
Stick with imPRESS: Our easy application press-on nails have such a strong bond, they rarely budge ‘til you remove them; the fun alternative to nail polish with no glue needed
Be Kiss Confident: We're a global leader in professional quality beauty products and treatments, with iconic brands sold in over 100 countries; We empower beauty enthusiasts to “Bring the Salon Home"